
Cost Capture lets inspectors record damage costs during an inspection, mark them as resident charges (chargebacks), and review them before they are saved, approved or sent to your PMS. It is most often used at resident move-out to charge back damages, but you can use it on any inspection type.
🎬 Watch it in action: Watch: The Hidden Cost in Your Service Contracts
 In this article
- Cost Capture video walkthrough
- Who uses Cost Capture
- Before you start
- Turn on Cost Capture for an inspection template
- Cost Sheets training
- Create a cost sheet in Admin Center
- Edit line items on a cost sheet
- When cost sheets get new line items to review
- Review new line items
- Rename a cost sheet
- Duplicate a cost sheet
- Assign properties to a cost sheet
- Assign orphaned properties
- Quick-assign window
- Set a default cost sheet
- Delete a cost sheet
- Check a template is ready for Cost Capture
- Capture costs during an inspection (desktop or mobile)
- Item Cost window on mobile
- Set the cost and who pays
- Split charge on mobile
- Review charges at the end of the inspection
- Review Charges window on mobile
- Generate the inspection report with costs
- Adding the approval workflow
- Approve pending resident charges (desktop)
- Reports with charges pending approval
- Frequently asked questions
 Cost Capture is in General Access
The Cost Capture workflow is live for all customers. It does not change your previous or current inspection workflow. To turn it on, follow the setup sections below, starting with the inspection template.
Cost Capture video walkthrough
Cost Capture workflow user guide (video)
Who uses Cost Capture
HappyCo built Cost Capture to cover the whole workflow, from admin setup to the inspector in the field. It is delivered in three phases, and you can adopt it at any phase.
- Admins: manage default costs with cost sheets, assign several properties to one cost sheet, see unassigned (orphaned) properties in a warning banner, and get an email when new items need review.
- Operations, Property and Maintenance Managers: review and approve resident charges before they are sent to Accounting.
- Technicians and Inspectors: capture charges, choose resident charges and submit them for approval inside the inspection.
- Residents: get an inspection report with charges and photos summarized at the top, with charges sent to the PMS for Accounting to process.
- Accountants: receive resident charges in the PMS automatically, with resident name, damage descriptions, charge amounts and a link to the inspection report with photos.
| Phase | Status |
|---|---|
| 1. Cost Sheets and Cost Capture | General Access |
| 2. Approval Workflow | General Access |
| 3. Integrated Resident Charges: Yardi | Early Access (contact your CSM/CX representative to enable) |
| 3. Integrated Resident Charges: Entrata | Early Access (contact your CSM/CX representative to enable) |
| 3. Integrated Resident Charges: RealPage | Early Access (contact your CSM/CX representative to enable) |
| 3. Integrated Resident Charges: ResMan | Not planned |
| 3. Integrated Resident Charges: AppFolio | Not planned |
| 3. Integrated Resident Charges: MRI | Not planned |
Before you start
- Cost Capture turned on for each inspection template you want to use
- At least one cost sheet created and its line items reviewed
- Properties assigned to a cost sheet
- Optional: at least one user with the Approve Resident Charges permission, for approvals
Turn on Cost Capture for an inspection template
 Open Templates
Select the gear icon in Happy Property Maintenance, then select Templates.
 Open the template
Search for and select the template you want to capture costs with.
 Turn on Cost Capture Workflow Enabled
Switch on the Cost Capture Workflow Enabled toggle.
 Tip
Repeat for each template you want to capture charges with.
 Check the ratings
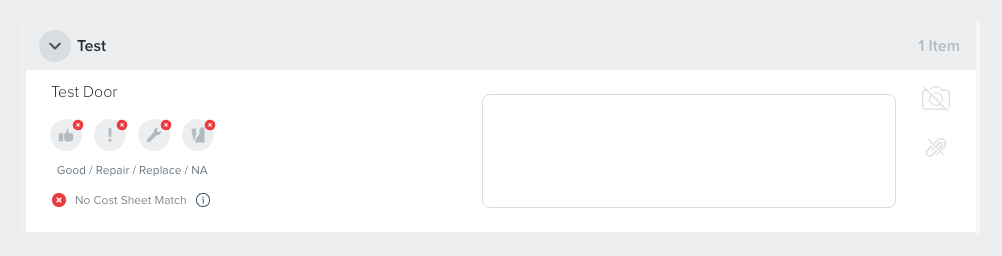
A red X now shows above each rating for each inspection item.
Tip
This is intentional. The red X's turn into green checkmarks once the items are added to your cost sheets.
Cost Sheets training
Cost Sheets interactive training video
Create a cost sheet in Admin Center
Open Cost Sheets
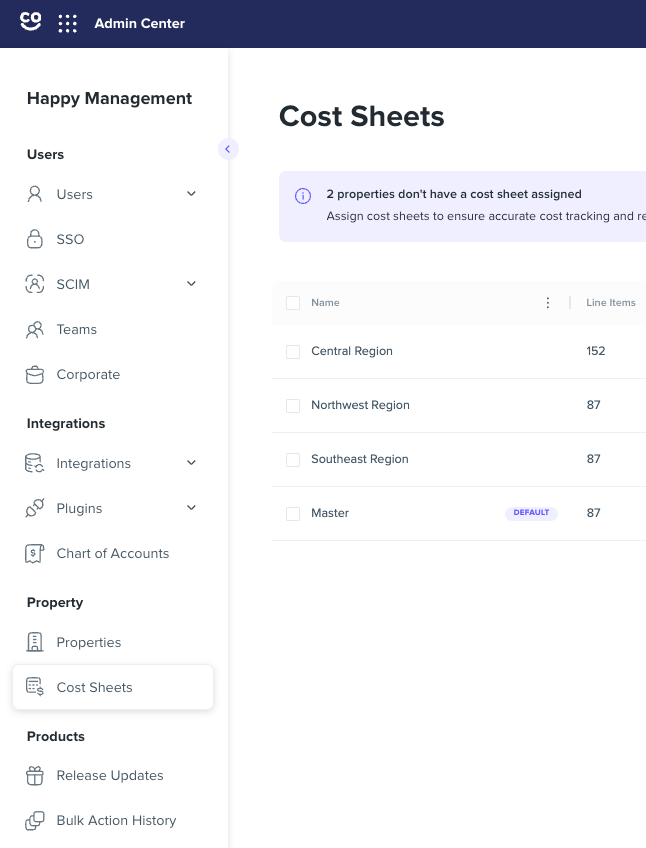
Open Admin Center and select Cost Sheets in the navigation.
Tip
No cost sheets exist by default.
Start a new cost sheet
Select New Cost Sheet in the top right corner, then download the .xlsx template.
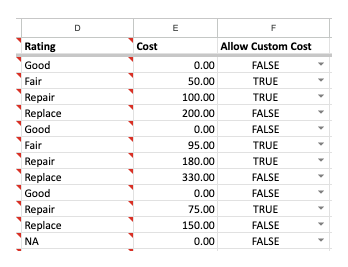
Fill in the Cost and Allow Custom Cost columns
Open the spreadsheet in any editor and enter values in the Cost and Allow Custom Cost columns only.
Tip
The first four columns are locked on purpose. Leave the cost at 0.00 for any item where a default cost doesn't apply.
Upload the file
Save the spreadsheet and upload it back into the Cost Sheet workflow.
 Name the cost sheet
Enter a name for the cost sheet. Optionally mark it as the default.
 Check the Cost Sheets list
The new cost sheet appears on the Cost Sheets landing page.
What Allow Custom Cost does
Set Allow Custom Cost to true to let the inspector override the default cost. Set it to false and the default cost cannot be overridden.
Repair vs. Replace
Consider allowing a custom cost for items marked Repair, since repair damage can vary a lot. You may not want custom costs for items marked Replace, where the cost is set by the lease agreement or you know the true cost to replace.
Cost sheets by region, class or property
Many customers create cost sheets by region or class, since parts and replacement pricing varies by region and quality. You can also create a cost sheet for one property: for instance, a property in a very expensive area such as Orange County, CA.
Edit line items on a cost sheet
Open Edit Line Items
On the Cost Sheets landing page, select a cost sheet to open its menu, then select Edit Line Items.
Edit the cost
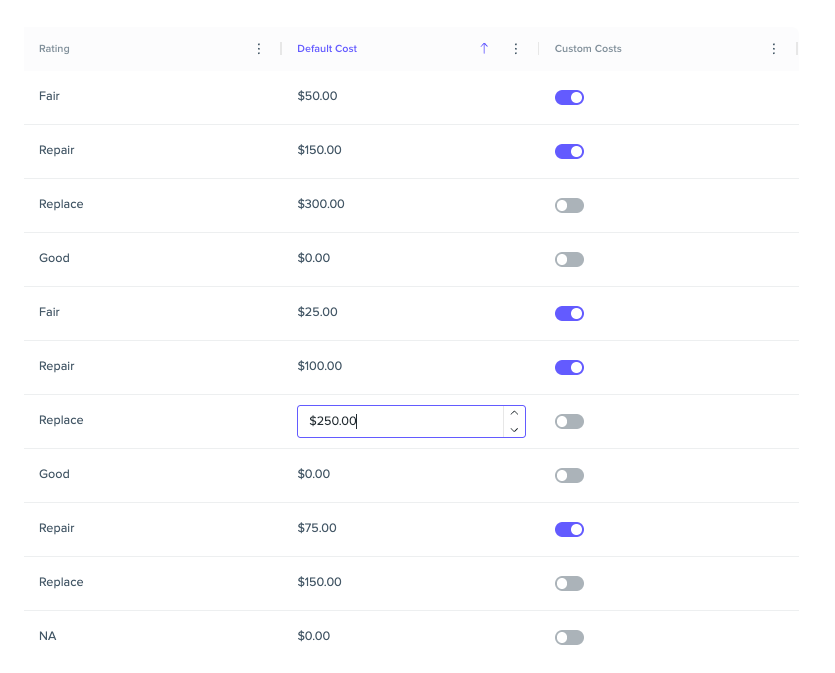
Select the Default Cost field to edit it in line, or switch the Custom Cost toggle.
Tip
Edits apply only to the cost sheet you are editing, since each cost sheet holds its own default values.
Find items with search
Type in the search bar to find an item, for instance all doors.
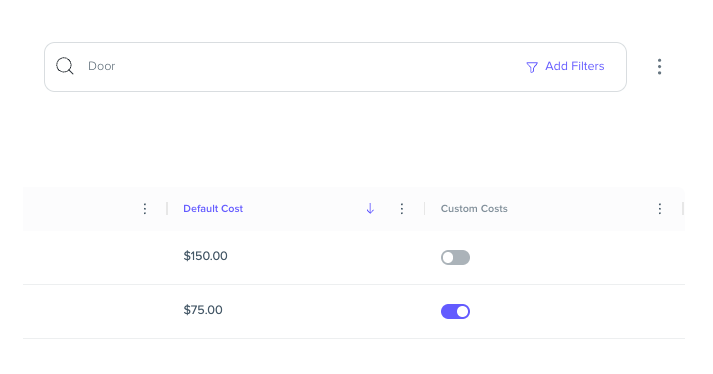
Narrow results with filters
Use the filters to combine search criteria.
When cost sheets get new line items to review
Your cost sheets get new line items to review when either of these happens. All admins are notified by email.
- Cost Capture is turned on for another inspection template
- Line items are edited or added on a template that already has Cost Capture turned on
Review new line items
Find cost sheets that need review
On the Cost Sheets landing page, look for the notification banner and the Action Required icon next to each cost sheet with items pending review.
Open the cost sheet
Open each cost sheet to see its banner with the option to review line items.
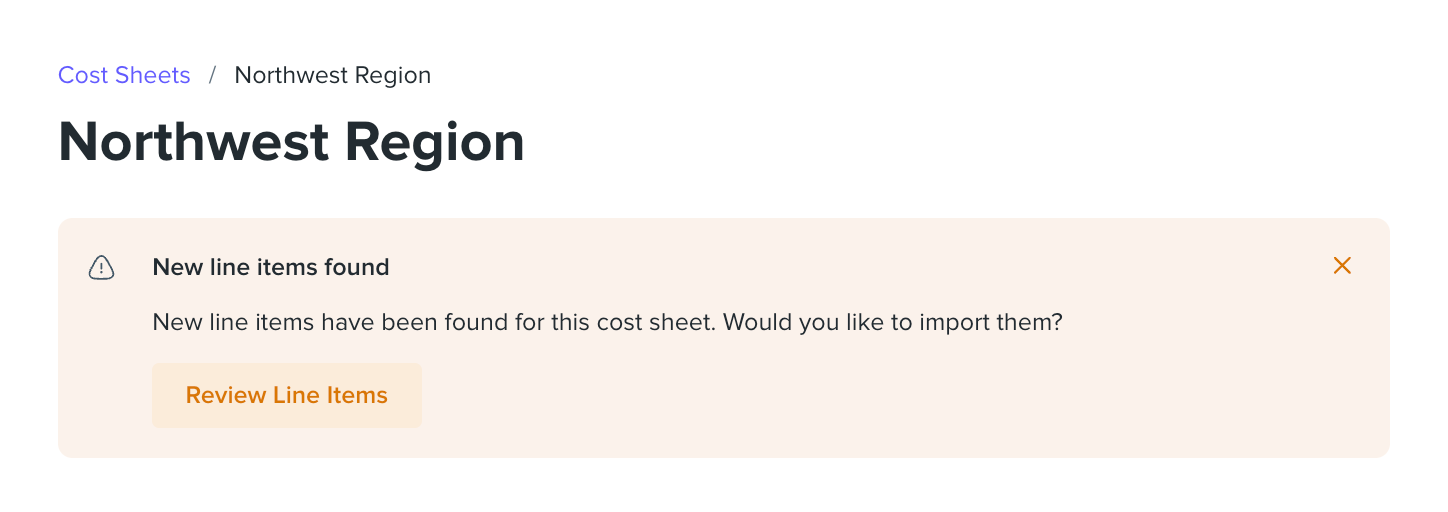
Enter costs for the new items
Select Review Line Items, then enter the default costs and turn on Custom Cost for each item as required.
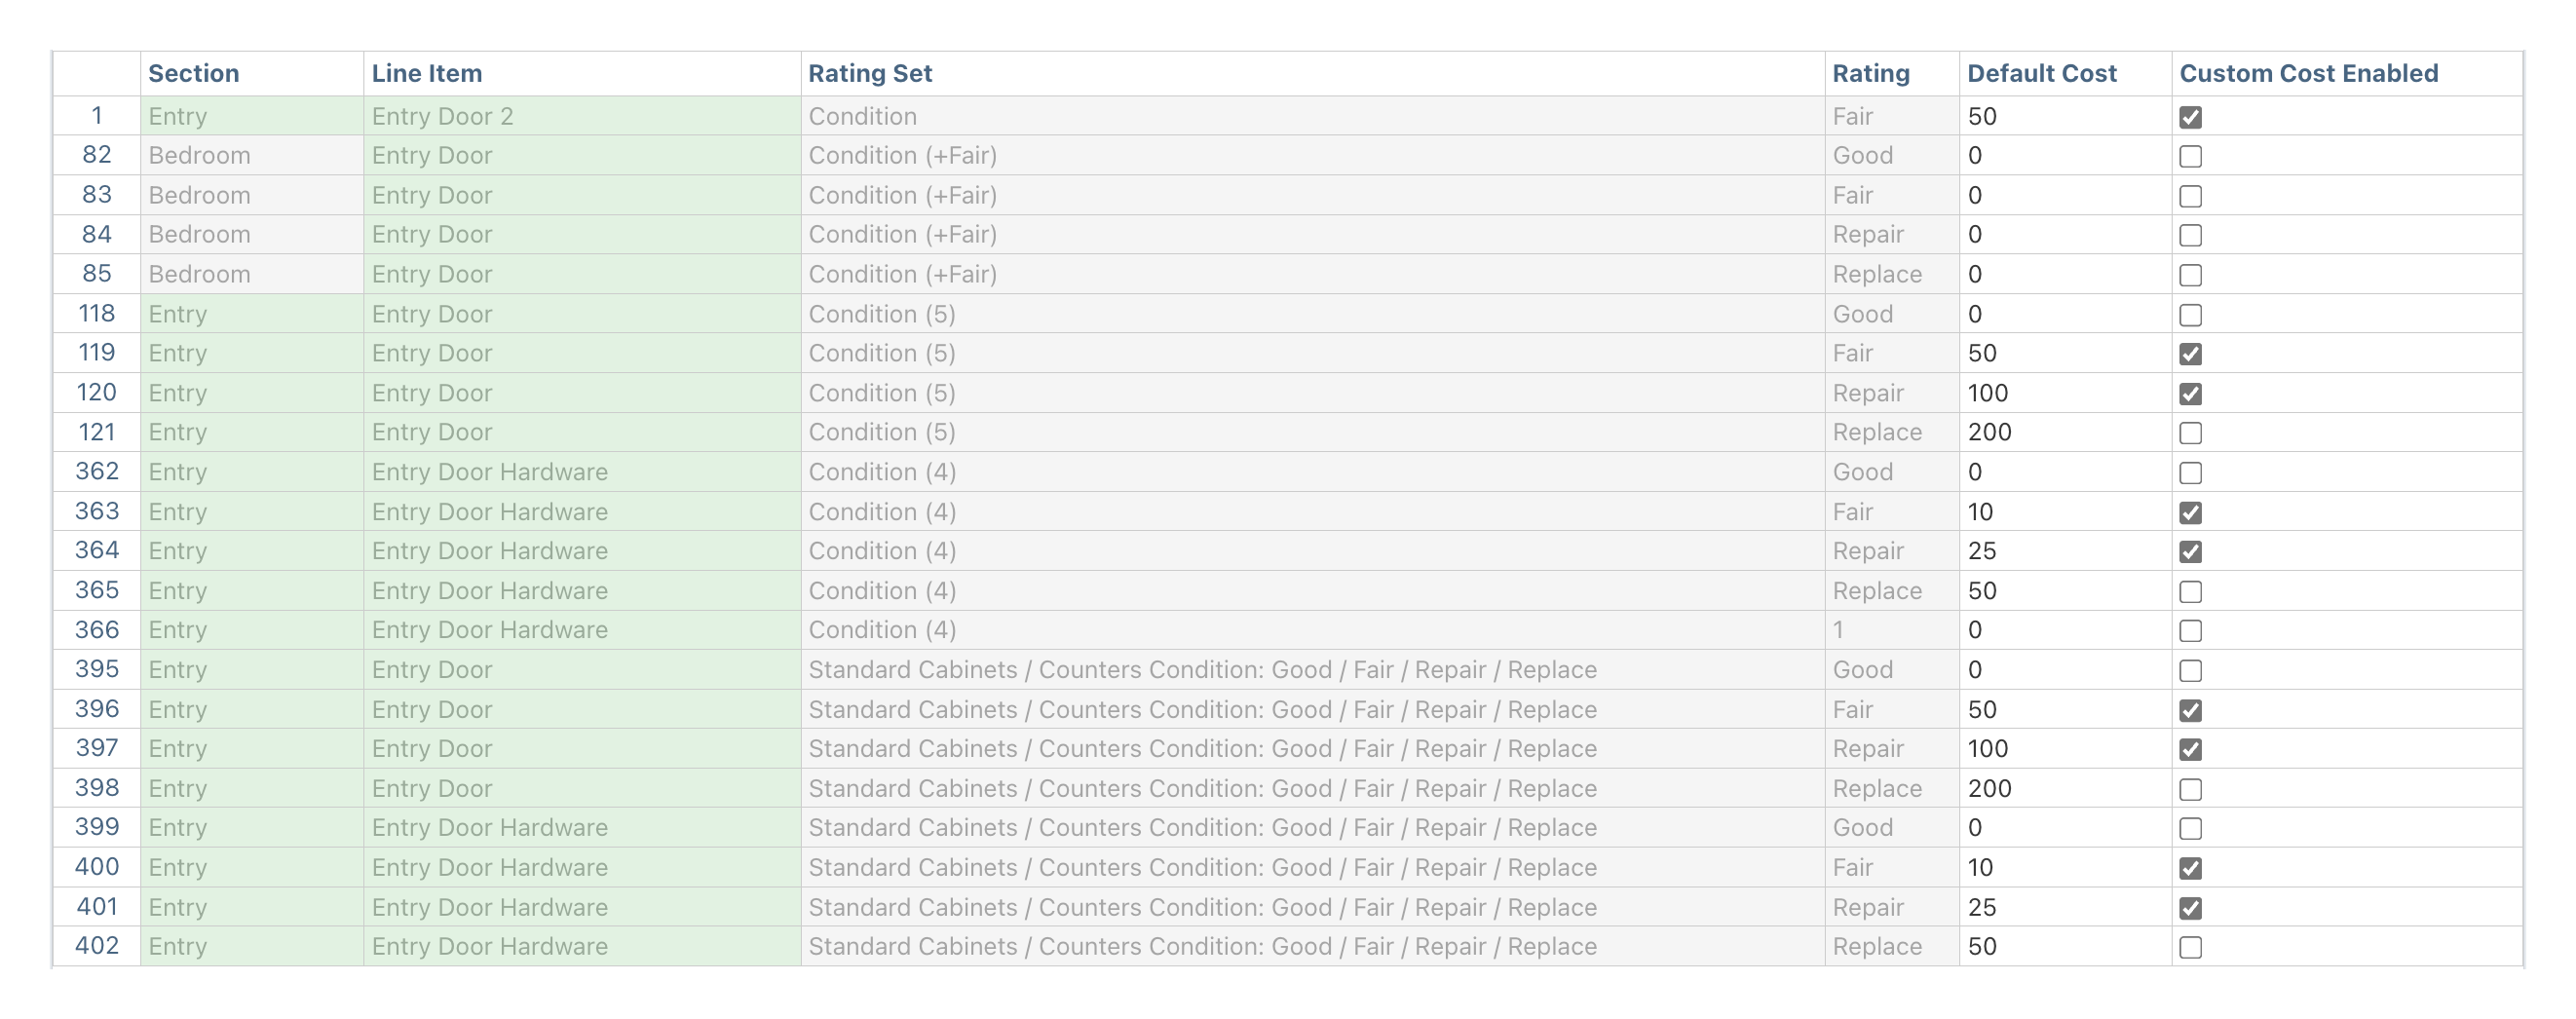
Finish the review
Select Finish. The banner is removed from that cost sheet and the landing page updates.
Tip
Once every cost sheet is reviewed, all banners and badges are removed.
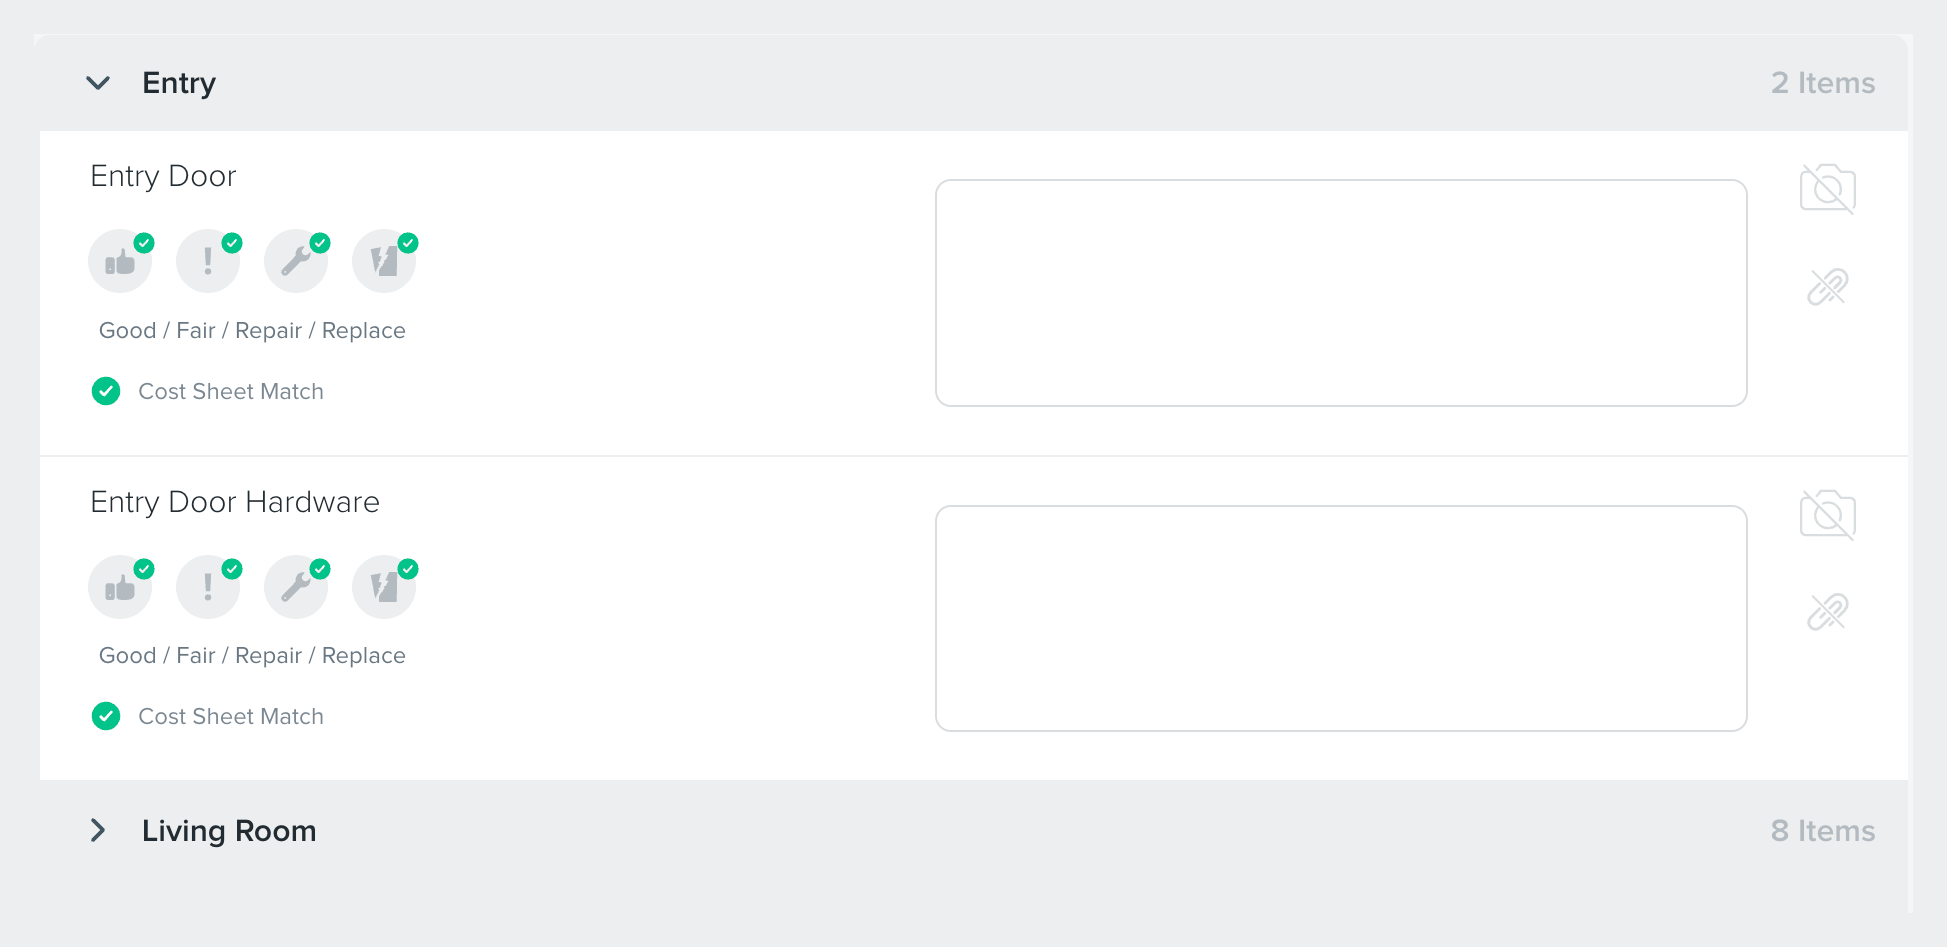
Confirm in the template
Open the inspection template and each section, and check that every rating for each line item shows a green checkmark.
Rename a cost sheet
Open Rename Cost Sheet
On the cost sheet menu, select Rename Cost Sheet.
Enter the new name
Type the new name when prompted.
Tip
If the name matches an existing cost sheet, HappyCo warns you and asks you to change it.
Duplicate a cost sheet
Open Duplicate Cost Sheet
On the cost sheet menu, select Duplicate Cost Sheet.
Tip
Duplicating can be faster than building a new cost sheet from scratch.
Name the copy
Select Duplicate and enter a name for the duplicate cost sheet.
Tip
All line items, saved values and custom cost selections are copied. Properties are not: assign them manually.
Assign properties to a cost sheet
Open Assign Properties
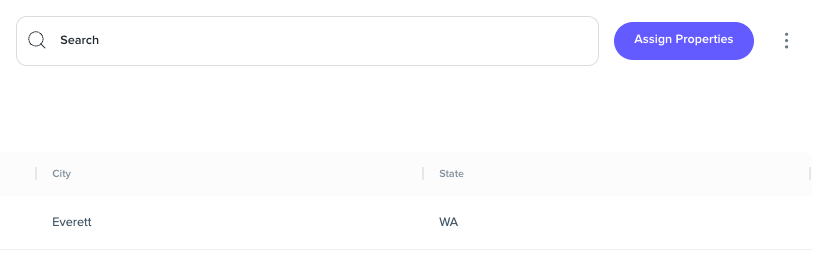
On the cost sheet menu, select Assign Properties to see the properties already assigned.
Tip
This list is empty after you first create the cost sheet.
Add properties
Select Assign Properties.
Select or clear properties
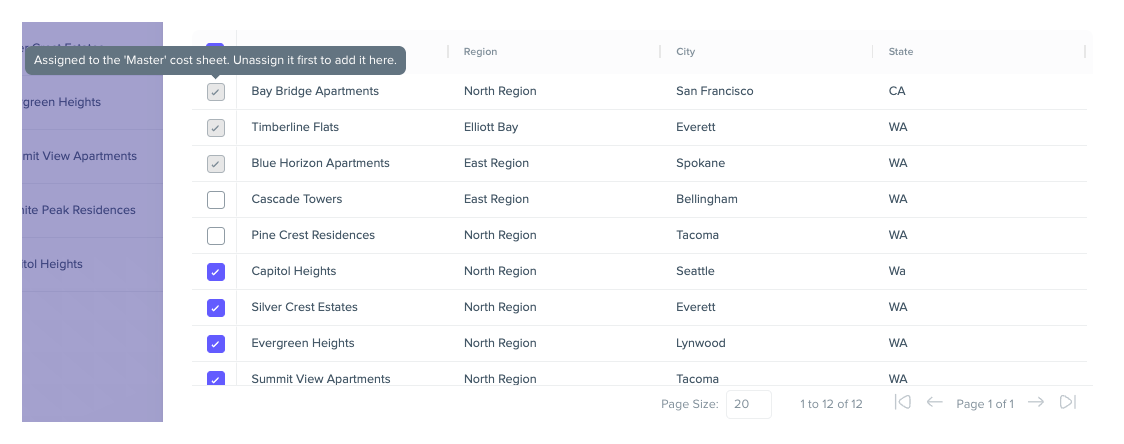
Click a white checkbox to assign a property, or a purple checkbox to unassign it.
Tip
A grey checkbox can't be clicked. Unassign the property from its current cost sheet first, which prevents mis-assignment.
| Checkbox | Meaning |
|---|---|
| Purple | Selected for this cost sheet |
| Grey | Assigned to another cost sheet (not clickable) |
| White | Unassigned |
Assign orphaned properties
Unassigned (orphaned) properties appear in a notification banner on the Cost Sheets landing page. Select Assign Cost Sheets to open a window where you can quick-assign them.
Quick-assign window
Set a default cost sheet
Select Use as Default
On the cost sheet menu, select Use as Default and confirm in the window that opens.
Tip
The default cost sheet is assigned to any property provisioned in future. The first cost sheet you create becomes the default automatically.
Check the default icon
The cost sheet title shows a default icon, and the option to make it default is disabled.
 You can't delete a default or assigned cost sheet
A cost sheet can't be deleted while it is the default or while any property is assigned to it. Deleting cannot be undone.
Delete a cost sheet
Select Delete
Open the cost sheet menu and select Delete.
Confirm the deletion
Confirm to delete the cost sheet.
Tip
This action cannot be undone.
Check a template is ready for Cost Capture
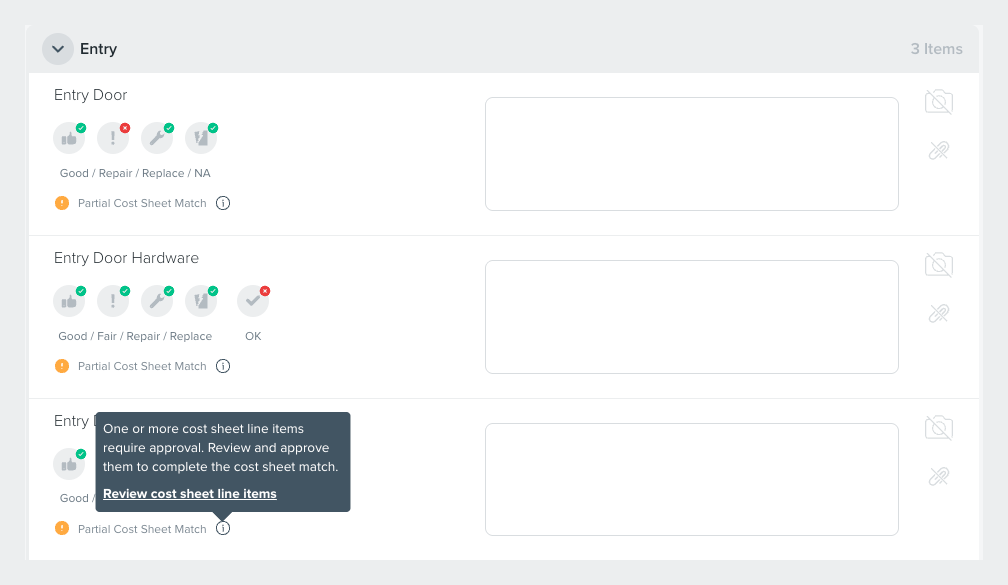
Cost Capture is the workflow inspectors use to capture costs, mark resident charges and review them after the inspection. After turning it on for a template, check each rating's icon: red means the item isn't yet configured on your cost sheets, green means it is.
Jump to pending items from the template
Hover over the tooltip to find a link to review pending cost sheet items. Once they are reviewed and added, the rating turns from red to green.
Works on desktop and mobile
Create or schedule inspections as normal. When a template has Cost Capture turned on, the Cost Capture workflow appears on both desktop and mobile.
Capture costs during an inspection (desktop or mobile)
Select an item rating
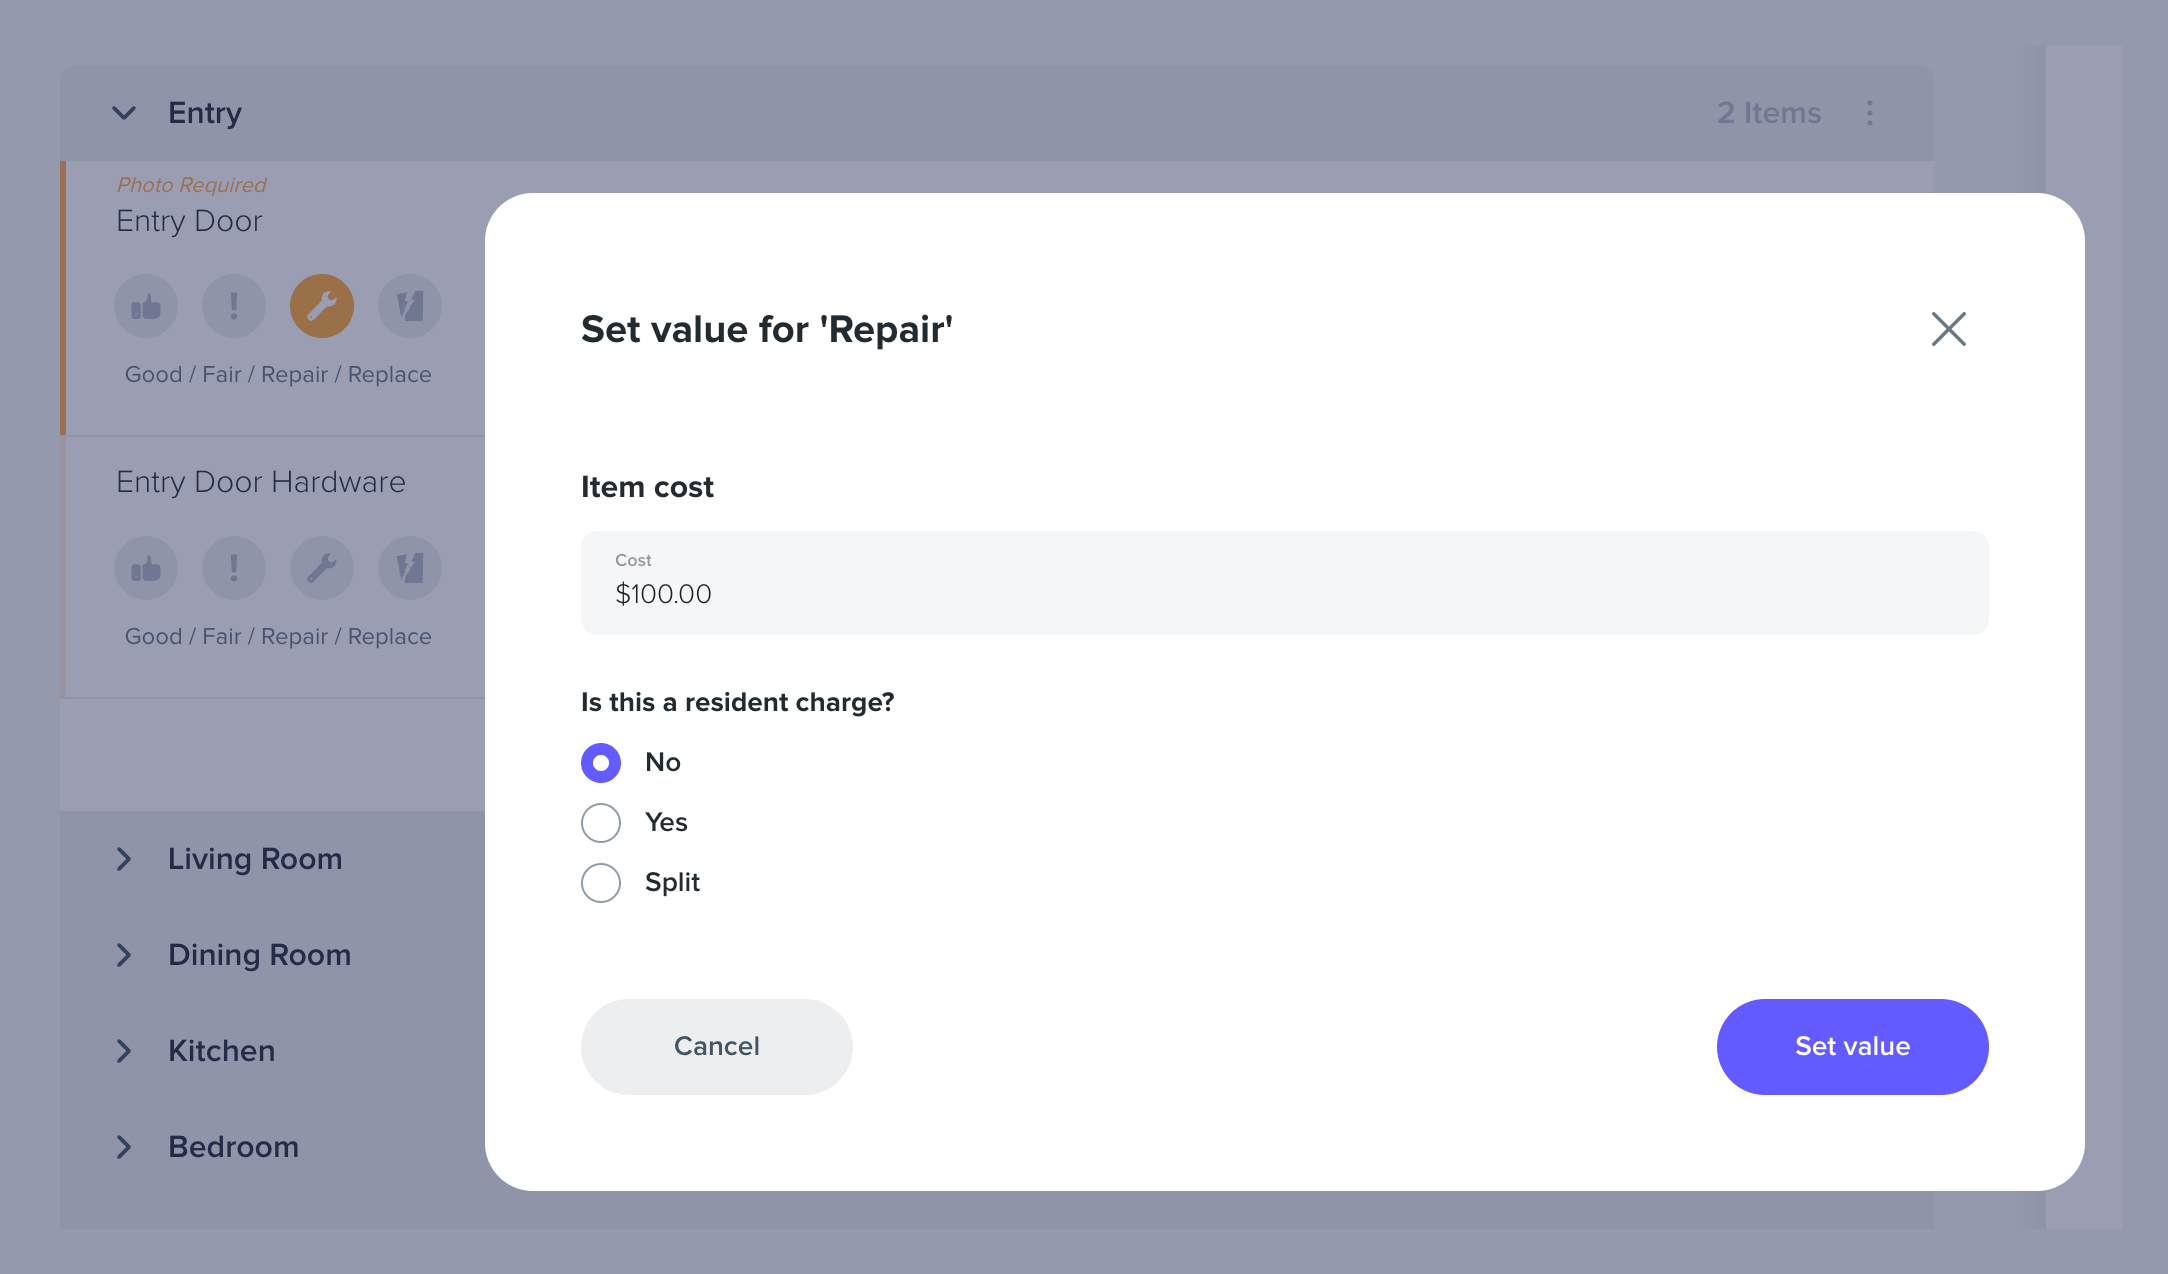
Open an inspection that uses Cost Capture and select an item and rating that has a default cost on the cost sheet. The Item Cost window opens.
Item Cost window on mobile
Set the cost and who pays
Choose the charge type
If Custom Cost is on for the rating, update the cost. Then choose a full resident charge, a split charge, or a property cost (answer No to Is this a resident charge).
Set a split, if used
For Split, choose a dollar split or a percentage.
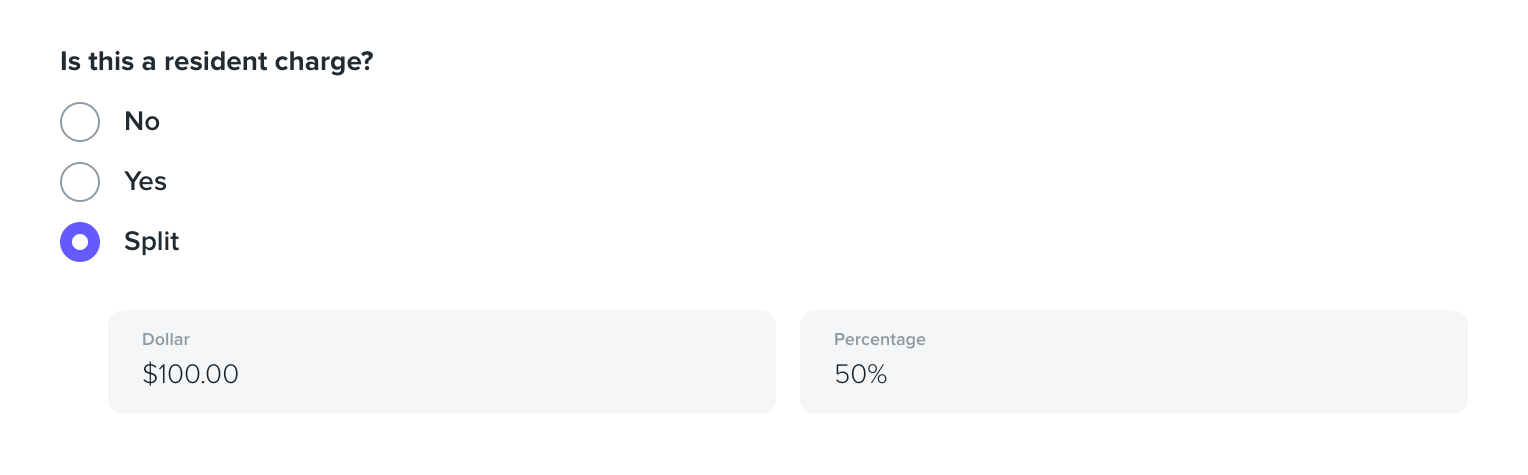
Split charge on mobile
Review charges at the end of the inspection
Complete the inspection
Complete the inspection to open the Review Charges window. It lists all inspection costs, how much the property covers vs. the resident, and a summary of charges at the bottom.
Choose who is charged
Select the current primary resident or the most recent past primary resident.
Save or submit the charges
Confirm and save the charges. If your company has assigned the Approve Resident Charges permission, submit them for approval instead.
Tip
See Adding the approval workflow below.
Review Charges window on mobile
Review charges wording: approver needed vs. not needed
The wording you see when reviewing charges changes depending on whether an approval is needed.
- Mobile app, approver needed: Confirm charges, with the message "Confirming charges will submit them for approval."
- Mobile app, no approver needed: Submit charges, with the message "No approval is required for this property. Submitted charges are final."
- Web: the window is titled Approve Charges or Review Charges. PMS-integrated properties see Approve/Review and Submit Charges.
Generate the inspection report with costs
Generate the report
After saving the charges, generate the inspection report. A Costs section at the top lists all costs, identifies resident charges and shows images of the damages.
Tip
Review the Costs section together with the resident.
Charge line items stay in each section
The Costs section summarizes all costs and charges at the top. Charge line items still appear in each section below, and the rest of the report is generated as normal.
Resident charges that need no approver
When no approver is needed, the inspection's activity log reads "No approver was needed for the resident charges: Resident Charge Approvals was set to Never Required", or notes the setting is required for integrated properties only and the property doesn't send resident charges to a PMS.
On the report, the Costs banner says "Charges are pending review by the property" until someone submits. After that it says "Charges have been reviewed & approved by the property", the same wording as when an approver approves.
Adding the approval workflow
Assign the approver permission
In Admin Center, go to Users then Roles and give one or more users the Approve Resident Charges permission.
Tip
Approval features show when at least one approver has access to the property the inspection is for.
Approve pending resident charges (desktop)
Find inspections with pending charges
As an approver, open the Inspections page. A banner and a bell icon mark each inspection with pending resident charges.
Filter to pending inspections
Select View Inspections in the banner.
Open an inspection
Select an inspection. The right sidebar shows a notification banner and a Charges section.
Open Approve Charges
Select Review & Approve in the banner or Approve Charges in the sidebar.
Review and approve
Update any value or the resident selection, then select Approve Charges. The charges are saved and removed from the pending list.
Tip
Open the window again to review what was approved and generate an updated inspection report.
Approving charges is desktop only
The Approve Charges window appears only on desktop. There is no mobile option to approve charges.
Reports with charges pending approval
When the approval flow is on and charges are not yet approved, users can still generate an inspection report. The report shows a banner saying charges are pending approval.
Frequently asked questions
Why does the mobile app show Submit charges instead of Confirm charges?
Submit charges appears when no approver is needed: "No approval is required for this property. Submitted charges are final." Confirm charges appears when an approver is needed, and confirming submits the charges for approval.